The rollers were cast using fast setting concrete. It is made by QuikCrete and comes in 10 pound plastic pails and larger bags. It does not contain any gravel. A 4" PVC pipe cap was used as a mold for the smaller roller. A 5/8" hole was drilled in the base of the pipe cap to accept the shaft. A shaft for the roller was made from 5/8" steel rod. A pin made from a short piece of 5/16" steel rod was inserted into a hole drilled in the shaft. This is embedded in the concrete and helps bond the concrete roller to the shaft and ensures torque is transferred well (i.e., without the pin, the roller would likely slip on the shaft). The pin could just as well be made of 1/4" steel rod. The shaft assembly was inserted into the hole in the pipe cap and plumbed. A rather stiff mix of concrete was made (stronger but a bit harder to get all of the air voids out), poured to a depth of about 1.75" in the mold and rodded and tamped well. After the concrete set (about 24 hours), the pipe form was removed by cutting slots along it's periphery with a table saw and then prying off the plastic in chunks.
Construction of the larger 7" diameter roller was similiar except a plastic bucket was used as a mold. It was cut away with a knife rather than using the table saw to cut slots.
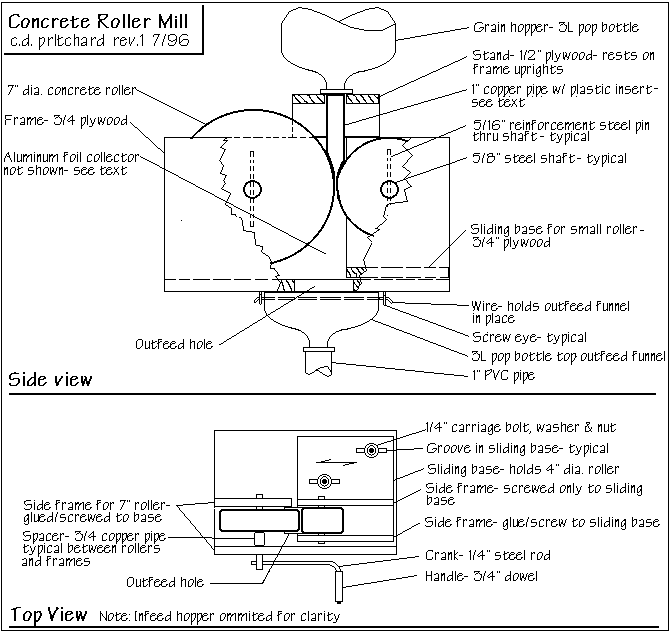
The frame consists of two separate pieces- a base and frame for the big roller and a smaller base/frame for the smaller roller. The later frame/base rests on the former and slides back and forth giving one a means for adjusting the gap between the rollers. Two carriage bolts inserted up throught the bottom base and through grooves in the top (small roller) base are capped with washers and nuts. These secure the sliding base/frame in place after the gap has been adjusted. The frame was made from 3/4" plywood (use the strongest and denses stuff you can find!) The rollers were then mounted into wood frames with cheap ball bearings similiar to those used on the little red wagon you had as a kid. The bearings were friction-fitted into holes drilled in the side-wall frame pieces. One of the two side frames for each roller is permently affixed to its base with glue and screws while the other side frame is removable- it's affixed with screws only. The removable side walls are necessary for installation and removal of the rollers.
The handle was fashioned from 1/4" steel rod stock. It is friction-fit to a hole in the shaft to allow for removal for storage and so a pulley can be used for powering the mill. The handle shaft was peened to a rough square shape where it met the mill shaft and the hole in the shaft was made roughly square and slightly tapered.
The rollers were a tad out of round and each had a slight taper so I used a right angle grinder with a masonary disk to true them up- did it by rotating the roller while applying the grinder to the periphery of the roller. Using a drill to spin the rollers speeds the job and gives a better result.
The infeed hopper was made from the top 3/4 of a plastic pop bottle. The infeed tube (between the hopper and the rollers' gap) was made from 1" diameter copper pipe. It's very difficult to get the bottom, business end of the pipe shaped to match the surface of the two rollers. If it doesn't fit well, grain will escape without being milled. Taking the easy way around the problem, I roughed the copper tube somewhat to shape, leaving it with a 1/8" or so clearance from the rollers, then inserted a rolled-up piece of thin (.05 or so) semi-flexible plastic into the infeed tube. Friction alone holds the thing in place. The resulting plastic inner tube was allowed it to extend a bit past the shaped end of the copper tube. The edge of the plastic tube was then shaped to conform to the rollers' surface by applying the tube to the rollers as they were turned thereby grinding away the plastic. I chucked a drill to the roller shafts to do the grinding- alternately spinning one wheel and then the other until the end of the plastic inner tube conformed well to the rollers.
The infeed tube/hopper assembly is mounted through a small "U" shaped frame made from 3 pieces of 1/2" plywood. This assemby the rests on the top of the roller side frames. A pin in the top the top of each of the two fixed frames marries with holes in the bottom of the assembly to ensure it's properly located.
The drawing does not show the aluminum foil "collector" used for collecting the milled grain and channeling it through a square hole in the lower base to the outfeed. It's made from a double layer of heavy gauge aluminum foil. I toyed with the idea of making this thing from plastic or aluminum flashing but the complex shape which is necessary disuaded me. The foil is easy shaped and is held in place with staples. The outfeed is fitted with a funnel made from the top 1/4 of a 3 liter plastic pop bottle. A lenght of 1" PVC pipe is fitted to the neck of the funnel. The pipe carries the milled grain to the collection container. The bottle is held to the frame with wire inserted through holes in the thing and through two screw eyes on the underside of the frame. This admittly ain't elegant, but it works and allows the thing to be removed for more compact storage.
For powering the mill, I tried using
a
direct-coupled 1/2", 350 RPM drill. It was too fast- alot of grain was
thrown from the mill due to the high surface speed of the large roller
and the grind contained alot of flour. I then tried a 1-1/2" pulley on
the drill and a 6" pulley on the shaft of the large roller. Much better!
Turning the mill by hand results in a through-put of about 1 lb./min.-
plenty fast for me, so, I seldom use the drill to power it.
To use the mill, I clamp it to the top
of my workbench- it projects over the edge which allows the outfeed
funnel
thing to be affixed.
Minor problems I've
encountered
When the mill is started, about 1/2 the
time you have to give the small roller a flick to get it started.
Powering
both rollers would solve this problem but, doing so adds alot of
complication
to the mill's design. I'm leaning toward mounting a pulley on each shaft
with a round cross-section belt connecting them. (BTW, it anyone knows
where I can mai order such belting (about 1' long or so), I'd *really*
appreciate hearing about it!) I figure I'll twist the belt into a figure
"8" so that the rollers counter-rotate. If this doesn't work, some idler
pulleys will be necessary. Atleast one will be necessary even with the
figure 8 belting to allow the belt to be mounted. With different size
rollers,
the right diameter pulleys are critical to ensuring the surface velocity
of the two rollers is the same. OTHO, maybe a slight difference in
velocity
would yeild a better grind???
The infeed hopper assembly infrequently raises itself slightly for some reason (vibration?). This allows some grain to pass through unmilled. Not enough of a problem for me to do anything about it yet- I just push it back on.
When milling some slightly sticky crystal malt, about 10% of the milled grain particles followed the rollers around instead of dropping into the collection hopper. Not enough of a problem to fix at this point. Perhaps piece of foil (ala the collector) acting as a roller scraper would work...
There seems to be a bit of give in the system- probably due to the sloppy fit of the bearings in the frame. I've noticed that very hard grain (cara-pils) doesn't get ground well without narrowing the gap between the rollers. Methinks it's due to the sloppy bearing mounting hole (I free-hand routed the holes rather than drilling them. Next time, I'll use a forester bit and I'll streghten the wood around the hole by soaking it in instant glue.
I use a powered leaf blower to clean
the
mill after use. If I'm not careful, it severely deforms the aluminum
foil
collector. I'm more careful now and live with this. BTW, alway clean
your
mill after use. I store mine in the shop and found lots of bugs and
spider
webs on it after not cleaning it before storage. Storage in a plastic
bag
would help if your anal about cleanliness.
Second Version
I recalled an old post to HBD which
stated
that large rollers don't require texturing so, I casted a 7" one using
a plastic bucket for a mold and mounted it to another frame with the
same
tangential steel plate. It also glazed over also so I added texturing
with
a cold chisel- 1/16" grooves every 1/2" or so. It worked fairly well;
however,
it takes (a guess) 7-10 ft-lbs to turn it. The concrete takes a groove
better if done within a day of casting.
Legal Mumbo-Jumbo:
Use any and all of the
above
for your own use for FREE! Use the stuff and make money with it and I
want
some of the $$$! Use any and all of the above at your own risk. It works
for me but may not for you, i.e. YMMV.